piablo
@SkruffsterCommand Line Interface (CLI) Basics: A Beginners Guide
Created by:
Who calls a CLI what?
A CLI is an invaluable tool for development. It's actually quite straightforward to use, but just a bit tricky to get used to initially. You can't see everything readily, like you would in your computer's graphical user interface, but we'll teach you how to navigate the pathways, so you can get around easily. CLI stands for Command Line Interface. Generally speaking, Linux users call a CLI a terminal, Mac users call it a console, Windows users a shell. All these names have some technical differences, and we are going to stick with CLI for now. Happy travels!
What do we have in store for you?
- A bit of background on CLIs
- Set up for different operating systems
- Navigating absolute and relative paths
- Creating and deleting files and folders
- Use of sudo command
Why are we using this primitive looking stuff in the 21st Century?
Come on, it's retro, so it must be cool! By using text commands, a CLI lets us right into the root of our commuter's file system i.e. its operating system, which is something very powerful, so extreme care is needed. We can also access a world of open source work (repositories, libraries, etc) that our fellow developers have created before us. It’s acts as a gateway for us to code and collaborate with the outside world using our local machine. And that's what makes it cool.
There are a few concepts we first need to understand before we start. A CLI is really old school, but it’s tried and tested. Still wondering? Using text is extremely resource efficient. No graphics. Text for input, text for output. For every task in the CLI, there’s a user command/programme for it. Each command is wrapped in the shell programme. This shell is an interpreter for any commands to the kernel (the operating system), which in turn is the gateway to all our hardware.
In our tutorial, we’ll only look at some basic commands to get you up and running.
A couple of things you are used to doing with text . . , but can’t do in a CLI . . .
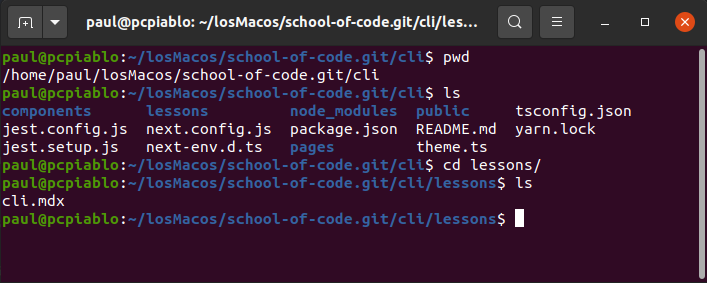
You can’t just place your mouse pointer anywhere in the window. Keyboard shortcuts you already know, won’t work the same in here. We do want you to remember CTRL+C, because it lets you abort any programme, or command that’s running e.g. if you make a mistake and the program gets stuck. But it won’t copy any text in there for you! And your arrow keys up and down will only take you through your previous commands. Handy for not re-typing long commands that need to be reused. Arrow keys left and right will let you move along the prompt line, if you need to correct a spelling error.....of a previous command! Below is what a CLI for Linux Ubuntu would look like:
If you are using a Mac or Windows, read below how to get your set up and then you can continue along with the rest of the Linux folks. We also include an extensive list of commands nearer the end of this lesson, but don't take any risks, and learn the basics first.
Use CLI commands with great attention! Using them wrongly can easily delete files or destroy your computer system completely!!
CLI for Mac
Before using the CLI environment for MacOS, you will need to install Homebrew.
What is Homebrew and why do we need it? Homebrew or brew is the Missing Package Manager for MacOS. It is the easiest and most flexible way to to install Linux tools that Apple did not include in MacOS. It can also install software not packaged in your Linux distribution to your home directory without requiring the sudo command, which we will look at later. A quick and recent guide to install brew can be found right here
Once it has been successfully installed, a list of its commands can be found by using the brew help command. brew can be used to install new programs such as Node.js or NVM. Once these programs are installed, it is not necessary to use the brew command, but rather the commands that are specific to the program you are using. For example for Node.js or NVM, you would use npm or nvm as commands. The installation of brew allows you to use all of the basic Linux commands described in the the Linux section.
CLI for Windows
Before you get started using your Windows machine for development, you will need to download and install Windows Subsystem for Linux 2. An easy guide to downloading and installing WSL-2 can be found right here
Once WSL-2 is installed on your machine, the commands are essentially the same as they are in Linux. You can find a list of some of the most basic Linux commands in the list above in the Linux section.
CLI for everyone, and at its core . . . Linux!
Right, now that we are all on the same Linux page, let's open a CLI up and have a look. From your Linux keyboard type press Ctrl+Alt+T and wait for the magic.
Where am I?
Let’s get moving around. When you’re in your Home folder, or Home directory as we call it, you will see the ~ tilda symbol at the end of your location, followed by $. Please pay attention to these symbols and whatever comes before $ as you learn. They are your compass.
myname@pcname:~$
Let’s just see how to check which directory you are in if you ever get lost. In lower case type the pwd - print working directory command followed by Enter. Printing it simply means displaying this present directory to the screen. Why don’t you have a go yourself:
myname@pcname:~$ pwd
/home/myname
myname@pcname:~$
Good, you’re still in your home folder! Our last line, known as the prompt line, or command line, is prompting you to type a new command if needed.
Sometimes you will run a command and get a lot of output. At other times, no new text output appears, just a new prompt line. That signifies a successful command result. There's no “hey, it worked!” confirmation, just silent efficiency!
Now that working directory! It's what the shell understands as the default location for carrying out any file operations. So if you create, search for, delete a file or directory, the shell will assume you want to do that in the directory you are working in. Otherwise you specify exactly where you want those operations done. Remember pwd is your friend if you’re ever lost, although what’s directly before $ will tell you too! Like we said, navigating starts out a bit tricky and quirky. But we will get there together!
Where do I want to go? Absolute and relative paths
Our cd command is our navigator. It simply means change directory, and we usually use cd like a verb e.g. Hey there, cd into your home directory. So let's cd into /
myname@pcname:~$ cd /
myname@pcname:/$
The working directory is now / which is your root directory, the main parent directory of your whole operating system, so be careful in there. All other sub directories and files branch out from that root directory in file trees. We’ll touch on another meaning of root later. Moving on, type the following:
myname@pcname:~$ cd home
myname@pcname:/home$ pwd
/home
You guessed it, you’re in your home directory, a sub directory of / (root). To cd back from any sub-directory to its immediate parent, use cd .. with a space before the two dots. To move up more than one level of parent directories, you can use them like so ../../.. etc. The two dots bring you one level back up the file tree, the forward slash signifies the parent above each level. Another little hint, the simple command of cd will take you from anywhere in your file system to your home directory.
Trying to cd into the wrong directory and getting lost, which happens to the best of us, looks like this:
bash: cd: WRONG DIRECTORY: No such file or directory,
Let’s try a few moves. Remember to pwd each time to check where you are, and compare that to the file names or symbols that come before the $ to reaffirm that:
myname@pcname:/home$ cd ..
myname@pcname:/$ pwd
myname@pcname:/$ cd
myname@pcname:~$ pwd
myname@pcname:~$ cd ../..
myname@pcname:/$ pwd
Just say you want to go up a few parents and then down into other sub-directories, you can do it in one go like this. First, cd into your home directory to get your bearings i.e. a feel for where you are:
myname@pcname:/$ cd
myname@pcname:~$ pwd
myname@pcname:~$ cd ../../usr/lib
myname@pcname:/usr/lib$ pwd
usr is a sub-directory of / and the parent of lib ....deep down in the root of the file system of your computer! So you went two levels up, and two down! This is called a relative path, which starts from, and therefore is relative to your working directory. But we can’t expect to know where all the files are on our hard disc, so we have some tricks in the form of absolute paths to help us find them more easily. We have actually used two of them already! Go and see if you find them!
We saw the simple cd command that switches us straight to home, and cd / which takes us directly to root. Since the forward slash signifies a parent, and by starting our path from the root, we can easily navigate to our destination file, or directory. Let’s just start from lib, go from there, through the root, and to our Documents directory:
myname@pcname:/usr/lib$ cd /home/myname/Documents
myname@pcname:~/Documents$ pwd
/home/myname/Documents
In the same way we can use the / to denote an absolute path from root, similarly the ~ lets us create an absolute path from our home directory. But let’s look at another little trick before we do that. It’s the cd - command. Yes that is a dash and not a tilda. It’s quite restricted in what it can do, but it can come in very handy. Try out this cd ~ four or five times. You don’t need to pwd afterwards each time, trust us, you’ll see what happens:
myname@pcname:~/Documents$ cd -
/usr/lib
myname@pcname:~/usr/lib$ cd -
home/myname/Documents
myname@pcname:~/Documents$ cd ~/Downloads
myname@pcname:~/Downloads$ pwd
home/myname/Downloads
So it simply switches back and forth between your present and last folder. Big deal! Believe it or not, you’ll get to like it!
So these are what we call paths (pathways) in your file system. All the packages that you’ll download and install in the future use the same basic file and directory tree path structure. Simple, powerful and effective.
Let’s make some files and folders to make sense of all of this!
We’re not going too in depth here, just enough to get your first couple of projects up and running. Further down the tracks, we’ll give you a few more tricks.
Who said folders? Tut tut,tut. We call them directories, you know that now!
As you build your dev experience, you’ll probably create a dedicated directory for all your development work. For reasons of safety, and just for practice, you’re going to create a temporary one right now in the /tmp directory inside your root. We do not want any mishaps in your file system after all.
From now on, we won’t display the whole command prompt line, just the actual commands. Now let’s mkdir!!! You guessed it, make a directory and then we’ll cd into it. One thing to note, is that you must make your file and directory names without spaces. There are ways around that, but we are not covering them this time around.
mkdir /tmp/learnbash
cd /tmp/learnbash
Note how we start with /, an absolute path. First to take us from root, and also to let us create our one new directory nested under /tmp. You can double check by pwd-ing, but we think you’re starting to get the hang of that by simply looking before that $ symbol on your prompt line!
Now, all in one go, let's to create a few directories dedicated to your well-being, and after we hit Enter, we want to list them using the ls command:
mkdir learnapple learnbanana learncoconut learndate
ls
learnapple learnbanana learncoconut learndate
The four directories are side by side, and not nested because we left a space between each of the four parameters/arguments.
Now using the touch command, we’re going to make a couple of files where you would be able to write any of your project code. You could of course create them in your code editor, but hey, we’re hardcore CLI devs:
cd learnapple
touch elderberry.js  fig.css  grapefruit.html
ls
Let’s cd back, and then straight into learnbanana and make a couple of files in there too:
cd ../learnbanana
touch honeydew.ts iboga.sol
What about deleting?
If you need to remove i.e. delete a file, you can use rm filename. If you need to remove directories, you need to make sure they’re empty first to be able to use rmdir. And you can't remove your working directory, that would be like vapourising yourself! So let’s see what happens if we don't empty them. First cd back into learnbash:
cd ..
rmdir learnapple learnbanana learncoconut learndate
So what happened?
rmdir: failed to remove 'learnapple': Directory not empty
rmdir: failed to remove 'learnbanana': Directory not empty
Like we said, we first need to remove the files from the directories.
There is an aggressive option for removing directories and the files they contain. If you choose to, use it with extreme caution. You might be used to having a Trash folder, where if you delete something by accident, you can retrieve it. When we’re working in our machine’s file system like this, there is no Trash folder!! Once you remove your files and folders, they are gone, gone for good.
The command we’re speaking of is rm -r and because of the -r switch, it removes the contained files and directories recursively. It more advisable to take the time to actually manually delete the files just using rm, and then cd .. back to the parent directory, so you can rmdir it like this:
cd learnbanana
rm honeydew.ts iboga.sol
cd ..
rmdir learnbanana
There is a lot more we want to show you, but this should be more than enough to get your files and directories set up for your NFT project. We have purposely left one more directory in there with some files, as we’re going to need it in our last steps.
The sudo command
Last, but certainly not least…..we have a command called sudo which is short for switch user and do this command, or super user do this command. It will give you superpowers, so be aware of that before using them. But before we start, some background for understanding security, your machine and the fact that you will enevitably be sharing code with colleagues. As an Open Sourcerer!!
As a developer, you can expect to do more than just modify a few files. You will be using code instructions that require you to perform tasks as the administrator of your machine. You’ll be searching for these online. Until now, we have been using the / to refer to the root directory, or help us navigate to and from it with absolute paths, but we are about to get into what some devs call the root command, which we mentioned at the start of this lesson. With great power comes great responsibility.
Your operating system is already set up to be as safe from attack as possible. Root can change up your whole system and actually open it up to all sorts of vulnerabilities around network services and firewalls, etc. It can let you do most anything. Sometimes you will get advice to download software and change permissions by using a super user command, but it could potentially open a hole where malware can get into your system. And that one command you use could end up triggering a chain reaction of many more. Remember, we’re only human, and also prone to making mistakes, so please be careful. Use good judgement when you find content online. If someone is asking you to use the root account, or the su command, it’s good to be super careful and if you actually feel suspicious, that’s okay. Unless you’re totally sure of what you are doing, ask around for solid advice e.g. on Stack Exchange (soon, you’ll be able to ask on our D_D Academy Forum, post-MVP!!) The safest source for software is actually from your operating system’s official repositories i.e. its app store, but as devs, we do need to work a lot from the command line.
I want to be a superuser too!!
Each time you use a sudo command, you will need to type in your own system's password. The default cache period for holding the password is 15 minutes in most Linux distros. Keep that in mind. If you are typing in commands in that time period, you are in superuser mode. Let’s use the cat command which would normally let us view the content of a directory, but because it has encrypted passwords, therefore sensitive, we will need our sudo command to access it. Try it without and then with sudo. Also note that your password will be invisible as you type it:
myname@pcname:/tmp/learnbash$ cat /etc/shadow
cat: /etc/shadow: Permission denied
myname@pcname:/tmp/learnbash$ sudo cat /etc/shadow
[sudo] password for myname: <password here>
So it gave you a list of passwords and.....stuff. Great. Now you’re going to type and run the reset command to clear out the terminal, and then run sudo cat /etc/shadow again. You won’t need your password this time. Why? Because your password is in the cache…..for the 15 minutes.
Just to give you some more context. If you are asked to use sudo apt-add repository to add a new software repository, be sure you trust the sources. Get them from the official source of the project you are working on. Some examples of commands that allow you to change a file’s permissions to make it executable are npm, npx, yarn, pip, wget, make and curl. You’re going to see a lot of some of these!
Let’s see sudo in action once more before we start to tidy up. If you’re using Ubuntu, then you have its standard repositories and you can follow along, otherwise just enjoy this as a little guide.
Type in the following, provide your password, press Enter and wait a few moments while the apt programme prints the process of the install to your CLI.
sudo apt install tree
When your command line prompt shows up again, you’re good to go!
tree
Wait. Is tree a command? No! tree is the name of a programme, and we can simply run a programme it like that. What else is different? What about our commands? Yes, they are a bit more complex than the ones at the start of this lesson.
When we use the sudo command without any switch options (the -r in rm -r is a switch), it will assume the next parameter is a command to run as a superuser, where any extra parameters will pass to that new command. Any sudo switch we might use, will start with either one or two hyphens. This lets it differentiate between a command and that option.
Also new to us is our command, apt, which itself takes the command install which tells apt to expect one or more software package names as parameters to add new software to our machine. So you can run any command as a superuser by putting sudo before it, but it’s not very often that you need to.
We hope we’ve helped you to think critically about using online resources that suggest using these tools. Use your super powers like a super dev would!
Tidying up - leaving a clean codebase
Now let’s clean out the last of our directories and files with the elusive, and most dangerous... rm -r!! Follow these last steps on your way to super stardom devland!
cd /tmp/learnbash
rmdir learnapple
rmdir: failed to remove 'learnapple': Directory not empty
rm -r learnapple
ls    <directory and files should be gone now>
cd ..
rmdir learnbash
cd <back home>
You should be back where you started with a clean slate and hopefully a few more skills to get you building. In the same way you opened your terminal window with Ctrl+Alt+Tab, you can close it with Ctrl+D.
We hope you enjoyed that and look forward to seeing you on your journey as a superstar, superuser, superdev!! Stay super safe!!
Some basic commands for CLI:
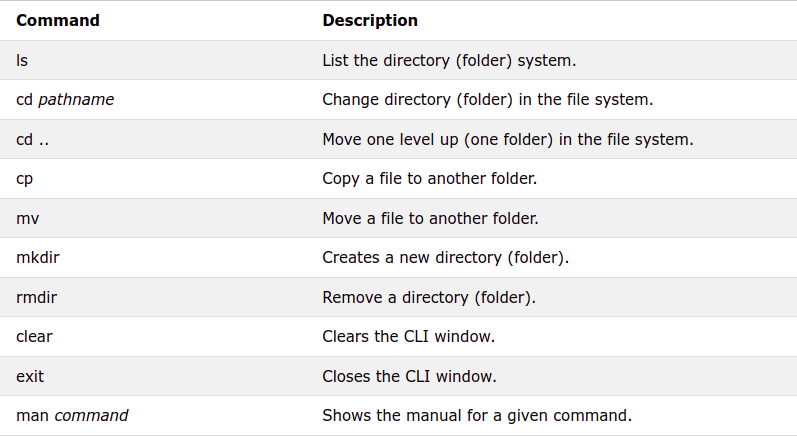
And a more extensive list of CLI commands