piablo
@SkruffsterUnderstanding Web3 Wallets
Created by:
What do we have in store?
If you are reading this, you may be new to blockchain development and want to know a bit about crypto wallets and how you can use them effectively along your way. We’ll look at wallet variants, typical use cases, we'll touch on public and private keys, and we’ll discover why without a wallet we just can’t get near a blockchain! We’ll also give you a run down of best practices on setting up your wallet for development, so you can get to work!
First a wee bit on wallet variants, use cases and users
A blockchain enthusiast can choose from a few different types.
Custody . . . who holds those elusive keys?
- Custodial: You don't have the keys, but a custodian does, e.g. a CEX - centralised exchange
- Non custodial: You do have the keys. You’re a web3 boss!
- Shared custody: Multiple people have different individual keys, i.e. a multi-sig
Wallets vary on their connectivity . . .
- Hot: Always connected to the internet, e.g. a browser extension, a mobile app, a CEX wallet
- Cold: Not connected to the internet, e.g. a USB hardware wallet, a paper wallet
- Warm: Connected, but requires a hot wallet to sign on behalf of an unconnected cold wallet's assets
The crypto original is the paper wallet. Make sure you have at least one paper, or alternative offline variant for all your private and public keys, mnemonic details and passwords, and keep them somewhere really.....really.....really safe.
A typical user would have a wallet for making transactions such as buying, selling, swapping, or staking of all sorts of crypto tokens. Also for signing other messages, e.g. casting a vote, claiming attendance at an event, proving identity, or getting access to an organisation’s Discord server. Multi-sig wallets, or safes are often used by organisations for added security. Multiple signatures are required to sign off on decisions or to authorise transactions. The list of types and use cases is growing fast. You may even use your own shiny, new wallet to sign and prove that you have completed a lesson you are doing right now!
So what actually goes on in this wallet?
First things first. A wallet doesn’t hold any tokens. It’s a miracle of software, which acts like a window, letting you look from a centralised Web2 internet into a decentralised Web3 network where for example those tokens do live on a blockchain ledger. Remember these two webs are not naturally connected. The wallet is actually how an everyday user or developer can connect with a blockchain, and also signal their digital identity and ownership of their assets.
What the wallet does hold, are called a public and private key pair, and let’s not forget the mnemonic seed recovery phrase that generates this key pair, all of which you should have noted safely on your cold paper wallet. Right?
Public and private keys. A simple analogy
Let’s remember that we are talking about a world of digital infrastructure where everything we send, receive and store as messages is represented. . . yes, digitally. Messages can be digital files of music, text, PDFs, video, you name it, and let’s not forget, digital money, i.e. cryptographic tokens. We can think of a public key as similar to an email address to which anyone can send an email message. And we can similarly consider a private key, as the password of that email account. We need the password to read any messages when they are destined for us, or send and sign any messages, to prove they come from us.
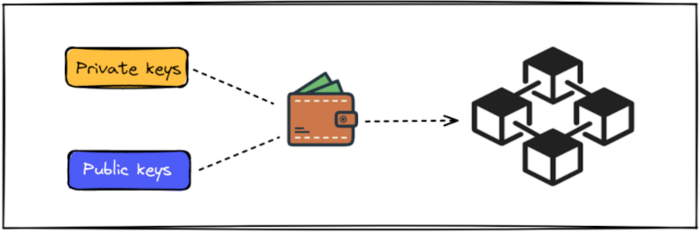
So, the public key is our digital identity on a decentralised network, e.g. a blockchain. Therefore if the last project you worked on has forgotten to pay you, make sure they have your public key, so they can send you a digital message . . . containing some digital money! And that private key of yours is what you use to sign any action, whether it is seeing or transacting with your assets, or simply proving who you are. Sharing your public keys is pretty much what you do want to do, but sharing your private keys is certainly not.
Generation of your wallet keys and blockchain address - the basics
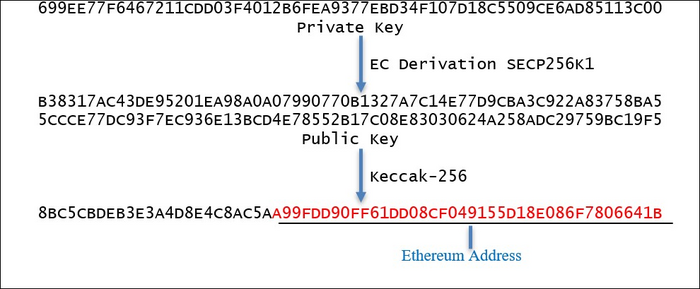
On downloading a wallet, the application generates a private key and an accompanying mnemonic phrase (12 or 24 random words from a finite list), which in turn generates a public key, and that gets encoded with the Keccak-256 hashing function to create a cryptographic blockchain address just for you. Lots of maths and cryptography!
Public Key Cryptography, even at a simplistic level, warrants some time, and we look forward to giving it proper attention in a dedicated blockchain fundamentals section. It is a cornerstone to the integrity of decentralised networks, letting us interact with each other on them safely. Together, they are a powerful pair for proving your identity and what you own.Guard your seed/recovery phrases and private keys with your life!
Enough chit-chat. Let’s get you set up . . . with safety in mind!
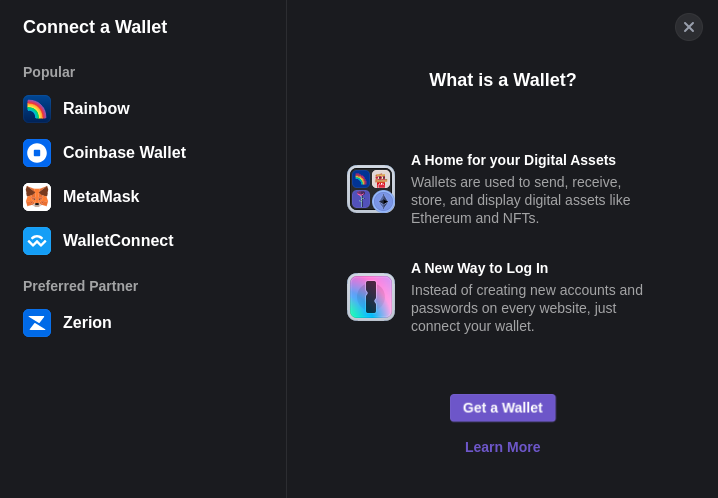
Download a Zerion wallet
Step 1
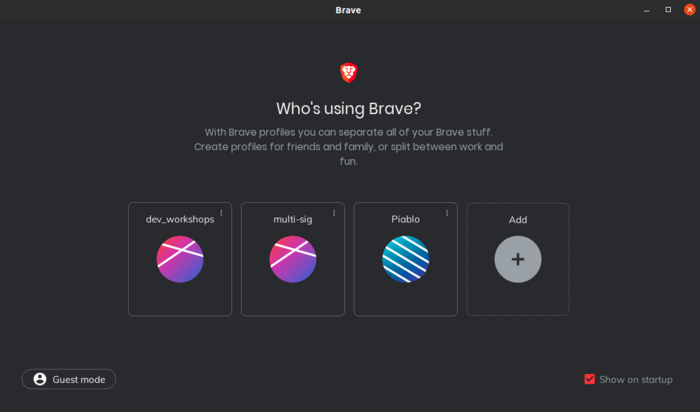
We recommend that you do not use your personal wallet for web development. And you can actually make your life a lot less complicated by creating a new browser profile for each new wallet. You can see below, I have different use cases for these profiles, and have a wallet for each. I don't keep any valuable mainnet tokens in the 'dev_workshops' instance - only test tokens with no financial value - perfect for development 🚀
You will have a separate mnemonic seed phrase, plus public and private keys for each one, and you will need to create a password, all of which you need to store safely somewhere.
You can generate any number of key pairs from the seed phrase, which means that you can create as many accounts as you want inside a particular wallet. As a developer, that’s handy when you need to send test transactions to mock actors when you are testing your apps. I also have a few accounts in my dev_workshops wallet.
Step 2
Download a wallet. We are going to be using Zerion. It’s a well audited wallet with lots of features to get our job done. Download Zerion extension here. Please, take your time, and follow the steps carefully:

To get your private key, which you'll need for deploying smart contracts, click on the following: Zerion browser icon => settings ⚙️ => Manage Wallets => choose the wallet you need => next, don't click on Recovery Phrase, but choose your wallet from the Wallets option => Private Key. Then enter your password, and copy the private key to clipboard for use. Remember to never disclose this key!
When you have completed the whole download process, make sure that you have your new address, your public and private keys, recovery phrase and password written down on paper and/or stored safely offline. If you have them saved on your machine and your operating system dies for whatever reason, you have no way of recovering these private details. There’s no customer service. Gone is gone.
Ready to Roll!
We will have a separate article on using Git and Github, as you will likely be using shared public repositories quite often. In the mean time, we'll show you how to safely store private keys in private .env files in our lessons.
Now you should be ready to get up and running with your projects. If you need test ETH, see the end of our article on Testnets, where you can find steps to the faucet for Sepolia Testnet. And check out Connect with RPC for when you need to start deploying your work to the distributed networks that make up Web3.
Don't lose those keys and happy coding!!!